There are many pluses that come with doing your own maintenance.
You can save a lot of money by not having to pay for someone else to do it, for example. You also get dirt under your fingernails and oil all over your hands, giving you the look and smell of a Real Man. Plus you get to use all those shiny tools you have in that big red toolbox. Most importantly, though, you get to create mechanical harmony between you and your machine. The intimate knowledge you gain from working on your own machine comes in handy should something happen in the future and it never hurts to know your bike works.
The biggest downside, unfortunately, is that if you cock up, you've only yourself to blame.
With the goal of mechanical harmony in mind, I set out on this blustery Autumn day to adjust the valves on my Guzzi. I have been hearing some tapping lately, more than the usual start up tapping and decided to check the adjustment. Now, many have said that Guzzi valve adjustments are fairly straightforward and simple. Thinking about it, it should be. There are only two valves per cylinder; one for the intake and one for the exhaust. The V11 engine also used pushrods to open the valves, meaning the solitary cam is in the block and out of the way. This really shouldn't be hard at all.
Right, let's get to it.
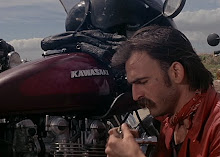
Begin by taking off the alternator cover. It helps to loosen the crossover pipe, a piece that was already strangely loose on my bike. You'll need to get access to the big nut so you can turn the crankshaft to set the pistons at top dead center (TDC). You'll have to move the rectifier out of the way and do a lot of wiggling to get the cover off. I had to bend the horns out of the way, too.
After the cover is off, this is what you'll see. The nut on the end of the crankshaft is 15/16, which, for those in foreign lands, is 24mm.
Before you turn the big nut, though, remove the spark plugs. This way you won't have to fight the compression as you turn the crankshaft. Begin by taking the spark plug protectors off the valve covers to give you better access to the plugs. As with most bikes, the plugs use the 13/16 plug socket. Once the plugs are out, rotate the crankshaft clockwise until the cylinder on the left is at TDC.
Using a 5mm hex socket, remove the other four bolts from the valve cover. Once that's been completed, the above picture is what you'll see. Like I said earlier, this is a very simple valve train.
With the piston at TDC, slide the feeler gauge between the valve and the rocker arm. The specs for the clearance are .006" for the intake and .008" for the exhaust. The clearance on my valves was about .004" over spec on all four valves.
To adjust the clearance, loosen the small 11mm nut on the rocker arm and turn the shaft with a small pair of pliers. Wiggle the feeler gauge in position as you turn the shaft and stop when you feel resistance. Once the proper resistance is felt, hold the shaft with the pliers and snug up the 11mm nut. Be careful snugging the nut as the shaft will rotate and throw off your adjustment. It's best to leave a little bit of clearance and then tighten the nut to get the clearance into spec. Repeat for the other three valves. For the right cylinder, you'll have to rotate the crankshaft to get that piston at TDC first.

Get the valve cover ready for installation by cleaning up the mating surfaces on the cylinder head and the cover. There was a bit of gasket residue left on the head and that can be removed with a razor blade and some caution. Don't get too aggressive or you'll gouge the aluminum and that would be bad. Luckily the paper gasket came off in one piece and stayed on the cover. A simple wipe down of the gasket on the cover and the surface of the cylinder head is the final step of prep.
To ensure a good seal, I like to use Permatex Indian Head Gasket Shellac Compound. It's like a Great Wall of China preventing the Mongolian engine oil from invading the outside of your engine. I'm surprised the P.C. ninnies haven't gone after the name of this stuff.
Anyway, this stuff's cheap so apply a liberal amount to the gasket. Don't inhale the fumes, though, or Hawkwind's lyrics might start to make sense. I'm guessing that maybe three people know who Hawkwind is. Repeat the above three steps for the other valve cover, minus the bad Hawkwind joke.
With the gasket sealer in place, plop the valve cover back on and torque the bolts to, um, some pound/feet. Make sure to put the spark plug back in before putting on the protectors. I made the mistake of not doing that and had to take them off again.
Finally, put the alternator cover back on and bolt up the rectifier. Tighten up the crossover pipe, too. Even with the clamps fully tightened, my crossover is still very loose. It's definitely something I'll have to address.
And there you have it. Moto Guzzi valve adjustments are as easy as they say. Having never done it before, the whole job took just under an hour to complete. As this is something that needs to be done every 6,000 miles, I'm sure I can get that time down as I get more familiar with the procedure.
Now I'm going to take my manly, oil-covered hands and do something manly. Maybe I'll go use a chainsaw or something.


I've never done this job before so your instructions were very helpful
ReplyDeleteThanks