I know I've gone on before about motorcycle maintenance building mechanical harmony and all that. This post is another one of those.
After a few rides last year, I began to notice a unique smell wafting from my Triumph. I did quick scan of the bike and the inevitable happened: my cam cover gasket was leaking. It wasn't a big leak but enough to smell. And it's a British bike so an oil leak should be natural. Since the bike was nearing its 12,000 valve check, I could use a cliche and kill two birds with one stone.
Alright, here goes:
The first step is to get the bike up on the jack. If you have a centerstand, you can feel smug and skip this step.
Make sure to strap the bike down. That is, unless you feel like picking it up off the garage floor. I didn't feel like it so I strapped my bike down.
Next pop the seat and the gas tank off. Be careful not to drop the tank or your life will suck. Make sure you inhale the gas fumes because...um...you just should, man.
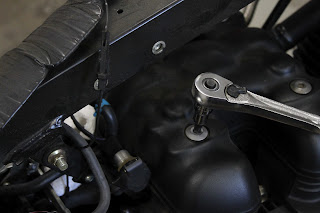
With all that stuff out of the way, you can now pop the cam cover off. Grab a 6mm hex socket and set to the four bolts. Loosen them and then finish unscrewing them by hand.
With the cam cover off, you should see a nice, clean top end like mine. Be sure to wipe the oil off the gasket surface before proceeding, just so you don't forget later, which you will and it will be too late. Now you can move along to checking the valves.
The first step is to take the spark plugs out. This makes turning the engine over easier because you're not fighting compression. The manual recommends removing the alternator cover and turning the big nut to rotate the engine. I forgot to order an alternator cover gasket so I had to rotate the engine another way. I shifted the bike into third gear and muscled the tire around until the cam lobes were in the right position. This way felt more manly and was therefore, the correct way.
I started with the exhaust side because...that's the side I started with. Rotate the back tire (or the big nut) until the cam lobes face directly away from the lifter. Specs for the exhaust valve clearance are between 0.25 and 0.30 mm. My valves were dead in the middle of the two values, which is good. Now onto the intake side...
Same thing: grab the back wheel and rotate the intake cam lobes into the correct position. Specs for the intake valve clearance are between 0.15 and 0.20 mm. Again, my intake valves were in between the two specs, which is good. Repeat for the other side.
Now that the clearance check is done, it's time to move on to replacing the gasket. Pry the old one off with a small screwdriver. The old gasket was surprisingly stiff for being rubber and only four years old. I hope the new gasket lasts longer.
Fit the new gasket on the cam cover. It looks like the gasket would stay in place since it sits in a groove but it won't. It kept popping out and I kept getting angry. To remedy this annoying turn of events, I put a dab of RTV on every corner to hold the gasket in place. It worked and prevented an embarrassing temper tantrum from me.
This is also a good time to replace the rubber seals that go around the cam cover bolts. Dig the seals out with the same small screwdriver used to remove the gasket from the cover. You'll have to dig a bit and most of the rubber will stay on the cover. Be warned: the new seals are much smaller than the ones you'll remove. The seals crush as you tighten the bolts and fill out the space so don't have a panic attack. Before installing the gasket, it's best to put some RTV on the cylinder head's sealing surface. You don't have to go crazy with the stuff; use a bead a few millimeters thick.
With the RTV in place, plop the cam cover back on, put the seals in their holes and start tightening the bolts. There's a torque spec in the manual for the cam cover bolts but I don't know what it is. I tightened the bolts until they felt tight to me. Now you'll have to clean off the RTV that squirted out. Don't be a dummy like me and use gray RTV on a black engine. I ran around like a fool trying to clean the excess off before it dried. Next time I'll use the black RTV.
Now only the simple things remain. Put the gas tank and the seat on, unstrap the bike, and then let it down off the jack. Let the RTV set for a time before you tear off toward the horizon. The RTV on my bike will get plenty of time to set because the temps are in the thirties and my skinny ass is not going riding in those temps.
And so there you have it. Mechanical harmony was created, the gods were pleased, and I got my motorcycle fix for February.
Subscribe to:
Post Comments (Atom)


You never mentioned you fish!
ReplyDelete